
Layer Manager (Panel)#
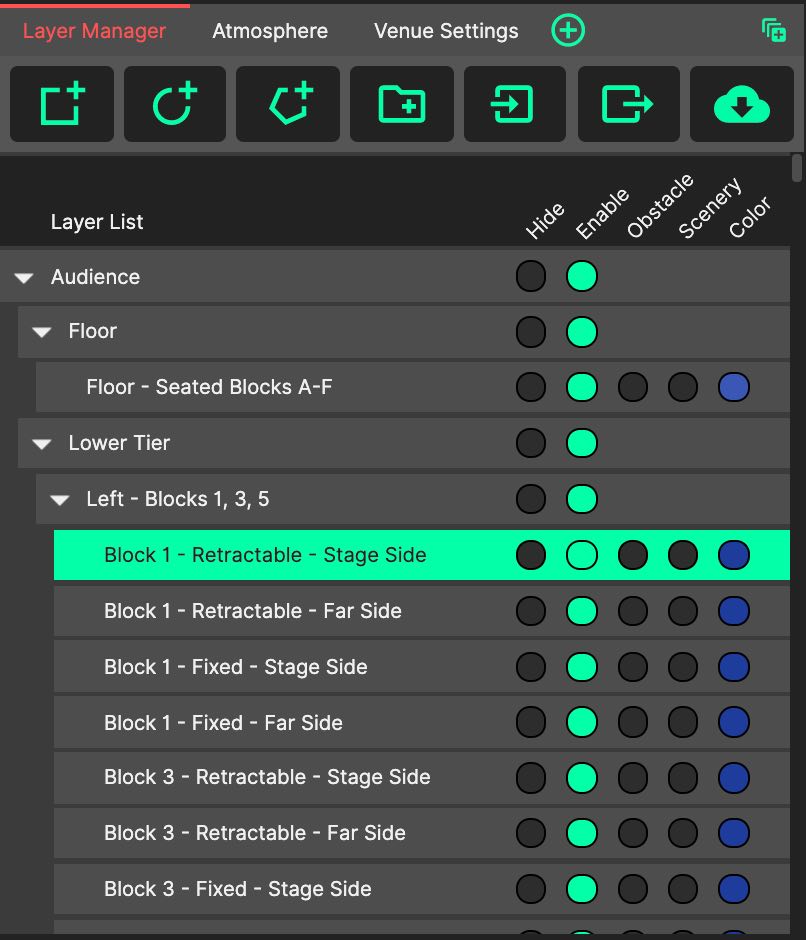
The Layer Manager organises all room geometry within a system design file.
- Creating Layers
Layers are added using the first three buttons in the Layer Manager’s top bar. From left to right, these will create a new Quad, new Sector and new Free Plane. Once created, the new layers join the bottom of the layer list, and are shown in the Edit Layer Panel ready for their data to be entered.
- Editing Layers
Click a layer (or a group) to select it and show it in the Edit Layer Panel. Click the selected row again, the list’s header, or the empty area below the list to clear the selection.
See each Layer Type page for information about entering their data, and how to draw them.
- Layer Groups
Layer groups also appear in the Layer Manager’s list, and are a way to manipulate many layers at once. For more information, see the page about Layer Groups.
- Layer Properties
Layers (and Layer Groups) can have attributes applied from the Layer Manager by clicking the round, green toggle for each property. For information about the job roles of these properties, see the page about Layer Properties.
- Selecting Multiple Layers
The layer list supports multiselect: Shift-click to select a range, and Ctrl/Cmd-click to add or remove individual layers. (The Edit Layer Panel shows a layer only while exactly one is selected.) The right-click menu then acts on the whole selection - remove, duplicate, mirror, mark as scenery or obstacle, enable or disable - and a multi-selection can be dragged into a group together. (‘Continue Layer’ remains a single-layer action.)
- Setting the Ear Height of Many Layers
‘Set ear height…’ in the layer right-click menu sets the listening height for every selected layer in one go. Applied to a group, it covers all the layers inside.
- Finding Layers from the 3D View
Click a layer in the 3D View to find it in the Layer Manager - its groups expand and the row scrolls into view. Double-click a layer in the 3D View to show it in the Edit Layer Panel.
- Importing and Exporting Layers
Using the import and export buttons on the Layer Manager’s top bar (after the folder button), layers can be imported and exported as System Optimiser Layer Files.
Importing layers can be used to transfer geometry from Trimble Sketchup using the CODA Sketchup Plugin, or from existing System Optimiser files.
Exporting layers allows only the room geometry to be transferred into new System Optimiser files.
- Venue Database
The last button on the Layer Manager’s top bar (the cloud) opens the Venue Database, where venues drawn by other users can be downloaded into the project, and the current venue can be submitted.
As with all Panels, the Layer Manager Panel can be resized and moved using Panel Drag & Drop, and ‘popped out’ into an additional System Optimiser window. The location of this Panel will be saved as part of the current tab.