HPSA Controller
This is the Horizontal Point Source Array Controller, which is used to adjust the parameters of new or existing HPSA Sources.
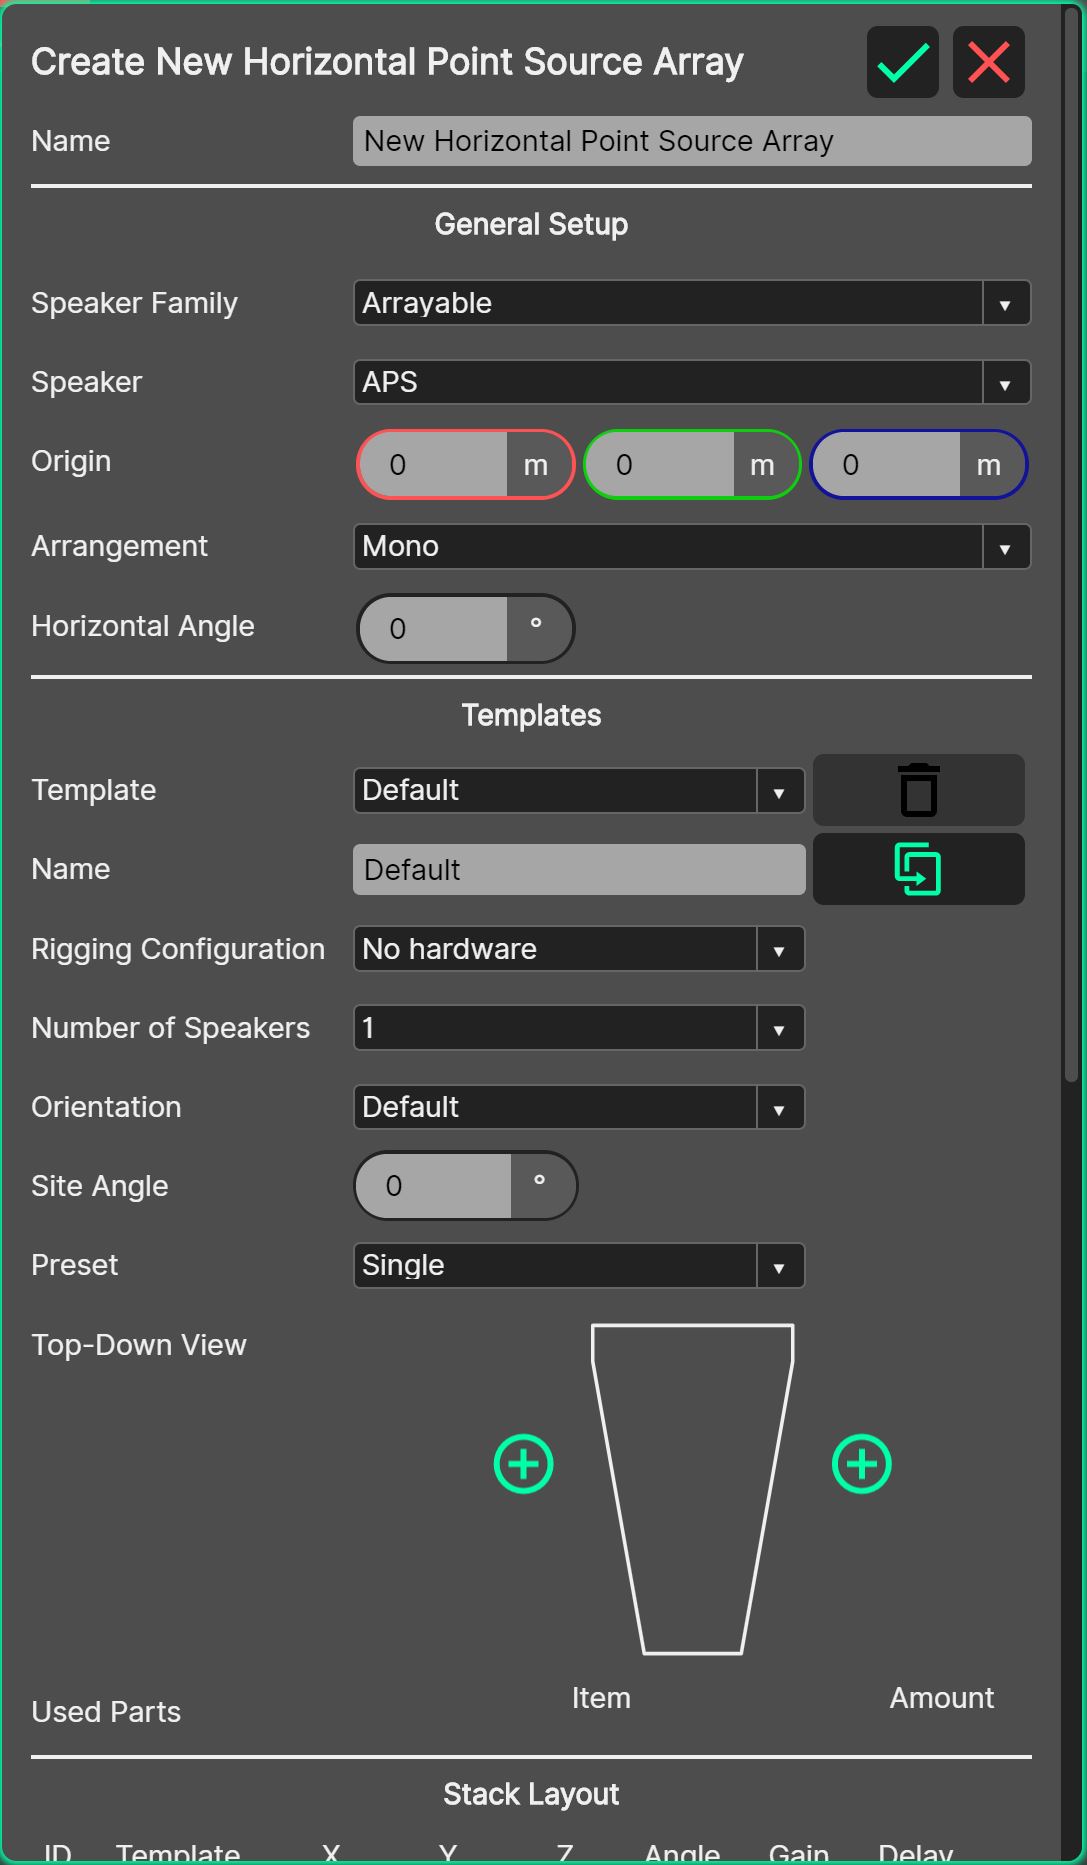
- Name
A helpful name should be entered here to allow for easy recognition of the horizontal point source array within the Source Manager.
General Setup
Speaker Family: Here is where the general ‘type’ of loudspeaker system should be chosen, be it a conventional type (such as HOPS), or an arrayable type (such as N-APS).
Speaker: When the loudspeaker family has been chosen from the drop-down list above, the actual model of the loudspeaker can now be chosen from the ‘Speaker’ drop-down.
Origin: The origin of a single loudspeaker is the top, front, centre of the loudspeaker, typically on the face of the loudspeaker at which the sound exits the enclosure. When a layout arrangement (other than Mono) is used, the origin of the controller is the centre-most position within the structure of the layout.
Arrangement: There are several arrangement strategies possible within the HPSA Controller, from simply placing one loudspeaker in the 3D View (Mono – which is the default strategy for a newly created HPSA entity) through to more complex shapes like ellipses and rectangles. See the section on Source Arrangements for information about each choice.
Horizontal Angle: The horizontal angle rotates the individual loudspeaker or array of horizontally arrayed loudspeakers about its origin around the Z-Axis.
Templates
Multiple templates can exist, to allow different loudspeaker configurations at different locations along the path set by the controller’s arrangement. See the section about templates for more information.
Template: By default, there is only one template, named ‘Default’. This default template contains the parameters of the loudspeaker(s) that are placed at every location along the arrangement path. This default template cannot be deleted. Create a new template by selecting ‘New Template’ from the bottom of the drop-down list. Delete a template using the red ‘trash bin’ icon.
Name: A helpful name should be entered here to allow for easy recognition of the template within the stack layout table below.
Rigging Configuration: Here the rigging accessories used by the template should be chosen, in order to populate the ‘used parts’ table below, and later, the bill of materials.
Number of Speakers: The ‘Number of Speakers’ drop-down allows for the number of loudspeakers to be chosen for the entity – either 1 or 0 in the case of a ‘conventional’ speaker family, but from 0 up to the maximum allowed within System Optimiser for the Arrayable family.
Orientation: Choose a rotation from the drop-down list in order to flip a loudspeaker on its side, for example.
Site Angle: Choose an aiming angle for the top of the first loudspeaker in an array, or, for the centre of the loudspeaker if it is conventional. This points the loudspeaker ‘up’ or ‘down’.
Presets: The ‘Presets’ drop-down chooses which electronic (amplifier) preset should be used for the loudspeaker chosen for the template. Only ‘legal’ presets are shown here, with the rest omitted for brevity.
Top-Down View: The top-down view allows loudspeakers to be added with the green ‘plus’ icon, or removed with the red ‘trash bin’. Clicking on a single speaker allows its parameters to be edited, such as choosing the dispersion of the couplers fitted. With no speakers selected, a ‘Set All’ drop-down will appear in order to adjust parameters of all speakers at once.
Used Parts: With the rigging configuration set, a table will be displayed below the ‘Edit Speaker’ drop-down. This table will be populated with the hardware required to suspend the loudspeaker.
Stack Layout Table
The stack layout table details the specifics of the loudspeakers generated by the arrangement tool.
It can be thought of in the following way - the arrangement tool at the top of the controller is used as a “constructor” to populate the stack layout table with the entities defined with the template system.
Using the stack layout table, it is possible to assign templates to entities, and override parameters generated by the arrangement tool manually. When a change has been made manually either to the layout, or the electronic filter settings, so that they differ from that of the arrangement tool (constructor), a reset button will turn green on the relevant row.
ID: The ID number within the stack layout table is the unique identifier for the entity within the table. The ID’s are labelled ‘left’ through ‘right’, with a centre entity if the ‘Number of Stacks’ is an odd number. The left and right orientation is if the loudspeakers were on the front of stage, as viewed from Front of House.
Template: The template system allows for the creation of different entities that can be placed along the placement path defined by the arrangement. This cell in the stack layout table is where the different templates are assigned to the different entities. The default template is set by default.
X / Y / Z: These parameters are the value of the origin of the entity along the corresponding axis, as defined by the arrangement tool above. It can be overridden by typing a new value in, or by highlighting and scrolling with the mouse.
Angle: This parameter is the value of the angular rotation of the entity about the Z-Axis as defined by the arrangement tool above. It can be overridden by typing a new value in, or by highlighting and scrolling with the mouse.
Gain: This parameter is the value of the gain of the entity. It can be overridden by typing a new value in, or by highlighting and scrolling with the mouse.
Delay: This parameter is the value of the delay of the entity. It can be overridden by typing a new value in, or by highlighting and scrolling with the mouse.
Reset Button: If any values (X / Y / Z / Angle / Gain / Delay) have been overridden by the user in the stack layout table, the reset button at the far right of the respective row will turn green. When this reset button is pressed, the data contained within this row within the stack layout table will be reset to the state that was generated by the constructor.
Reset All Button: To reset the entire table back to the state that was generated by the constructor, when any data is overridden, a ‘Reset All’ button is drawn below the stack layout table. Pressing this button will reset the entire stack layout table to the state created originally by the constructor.
Stereo Button:: When the stereo button is pressed, all layout adjustments (X / Y / Z / Angle) will be mirrored within the table, that is they will be adjusted in the equal and opposite sense automatically.
Array State
Array warnings and errors are displayed here. A warning will cause the source to have an orange background in the Source Manager. An error will cause the source to have an red background in the Source Manager.
See the section about Array States and Warnings for more information.
Filters and Parametric EQ
Each source controller has access to the full set of Tuning Filters available across System Optimiser and Linus Control.
See the section about Tuning Filters for more information.