HSA Controller
The Horizontal Subwoofer Array (HSA) controller is used to create layouts of subwoofers within System Optimiser. The controller can handle multiple arrangement strategies, ranging from one subwoofer, through to complex layouts. There are powerful tools included within the ‘Sub Arc’ arrangement that allow for very fast deployment of broadside arrays.
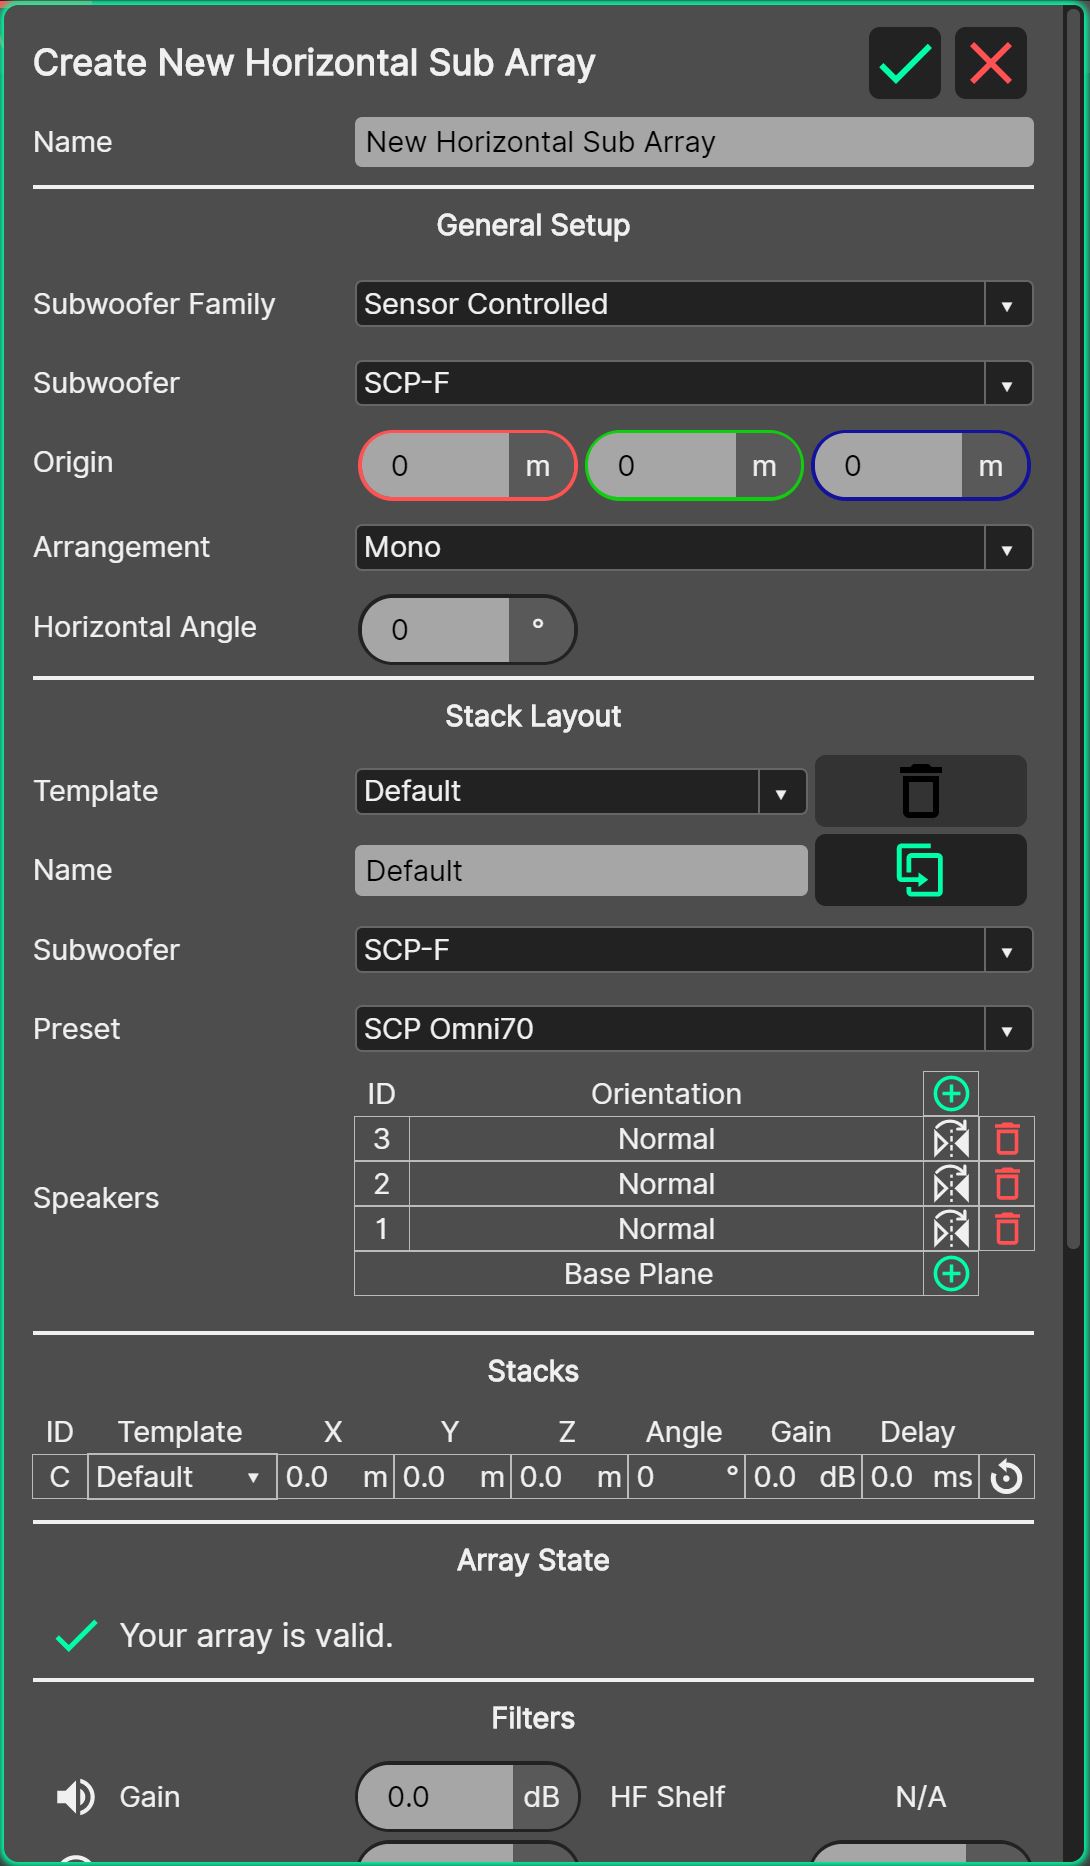
- Name
A helpful name should be entered here to allow for easy recognition of the array within the Source Manager.
General Setup
Subwoofer Family: Here is where the general ‘type’ of subwoofer is chosen, be it a Sensor Controlled subwoofer such as SCP or SCV, or a conventional subwoofer such as U12.
Subwoofer: This drop-down list selects the exact model of subwoofer to be added.
Origin: The origin parameter defines the position of the HSA. It is defined as the is the bottom, front, centre of the subwoofer. When an arrangement (other than Mono) is used, the position of the controller is the centre-most position within the structure of the arrangement.
Arrangement: There are several arrangement strategies possible within the HSA Controller, from simply placing one loudspeaker in the 3D View (Mono – which is the default strategy for a newly created HPSA entity) through to specific tools such as the ‘sub arc’ arrangement. See the section on Source Arrangements for information about each choice.
Horizontal Angle: The horizontal angle rotates the individual loudspeaker or array of horizontally arrayed loudspeakers about its origin around the Z-Axis.
Templates
Multiple templates can exist, to allow different loudspeaker configurations at different locations along the path set by the controller’s arrangement. See the section about templates for more information.
Template: By default, there is only one template, named ‘Default’. This default template contains the parameters of the loudspeaker(s) that are placed at every location along the arrangement path. This default template cannot be deleted. Create a new template by selecting ‘New Template’ from the bottom of the drop-down list. Delete a template using the red ‘trash bin’ icon.
Name: A helpful name should be entered here to allow for easy recognition of the template within the stacks table below.
Subwoofer: The subwoofers used in the template are defined within this drop-down. Only subwoofers that are part of the subwoofer family are shown in this drop-down list.
Preset: The preset for the subwoofer stack defined within this template can be chosen from this drop-down list. If an omni preset is chosen, the template engine will check whether all the subwoofers are actually in the forward-facing direction. If there are any subwoofers within the template that are not in fact forward facing, there will be a warning triangle next to the preset name, to alert you that if this preset is chosen, the subwoofers within the template will be spun to the correct forward-facing orientation.
- ‘Speakers’ Table: This table illustrates the configuration for the stack.
ID: The ID field contains the individual identifier for the individual subwoofer within the stack. Labelling for the subwoofers within the stacks are defined with 1 being closest the floor, with the ID number increasing as the stack gets higher.
Orientation: If the subwoofers support cardioid placement, they can either be set to Normal (Forward Facing) or Reversed, using the reverse button to the right of the Orientation cell. If the chosen preset is an omnidirectional preset, the reverse button is greyed out and unavailable. If a cardioid preset is chosen from the Preset field and one or more subwoofers within the hang template or another template within the same layout of subs are reversed, they will be set to Normal (Forward Facing) mode if an omnidirectional preset is chosen from the Preset field.
Reverse Button: The reverse button to the right of the orientation cell provides the method for reversing the subwoofer in the cell to its left. The reverse button is disabled if the preset field contains an omnidirectional preset.
Add and Delete Subwoofers: Subwoofers can be added or removed from anywhere in the stack using the green ‘plus’ icon and the red ‘trash bin’ respectively.
Stacks Table
ID: The ID number within the stacks table is the unique identifier for the entity within the table. The ID’s are labelled ‘left’ through ‘right’, with a centre entity if the ‘Number of Stacks’ is an odd number. The left and right orientation is if the loudspeakers were on the front of stage, as viewed from Front of House.
Template: The template system allows for the creation of different entities that can be placed along the placement path defined by the arrangement. This cell in the stack layout table is where the different templates are assigned to the different entities. The default template is set by default.
X / Y / Z: These parameters are the value of the origin of the entity along the corresponding axis, as defined by the arrangement tool above. It can be overridden by typing a new value in, or by highlighting and scrolling with the mouse.
Angle: This parameter is the value of the angular rotation of the entity about the Z-Axis as defined by the arrangement tool above. It can be overridden by typing a new value in, or by highlighting and scrolling with the mouse.
Gain: This parameter is the value of the gain of the entity. It can be overridden by typing a new value in, or by highlighting and scrolling with the mouse.
Delay: This parameter is the value of the delay of the entity. It can be overridden by typing a new value in, or by highlighting and scrolling with the mouse.
Reset Button: If any values (X / Y / Z / Angle / Gain / Delay) have been overridden by the user in the stack layout table, the reset button at the far right of the respective row will turn green. When this reset button is pressed, the data contained within this row within the stack layout table will be reset to the state that was generated by the constructor.
Reset All Button: To reset the entire table back to the state that was generated by the constructor, when any data is overridden, a ‘Reset All’ button is drawn below the stack layout table. Pressing this button will reset the entire stack layout table to the state created originally by the constructor.
Stereo Button:: When the stereo button is pressed, all layout adjustments (X / Y / Z / Angle) will be mirrored within the table, that is they will be adjusted in the equal and opposite sense automatically.
Array State
Array warnings and errors are displayed here. A warning will cause the source to have an orange background in the Source Manager. An error will cause the source to have an red background in the Source Manager.
See the section about Array States and Warnings for more information.
Filters and Parametric EQ
Each source controller has access to the full set of Tuning Filters available across System Optimiser and Linus Control.
See the section about Tuning Filters for more information.